
Every now and then, a simple meal evokes the comforts of home in the most delightful way. Enter the Tuna Melt—an open-faced sandwich that transforms pantry staples into a heartwarming dish. This recipe not only brings together chewy sourdough bread and tender tuna but also layers in the zing of wholegrain mustard and creamy mayonnaise, all lovingly topped with melted cheddar. What I love most is how quick and easy it is to prepare, making it a perfect weeknight dinner solution. Plus, it’s packed with protein, satisfying both cravings and health goals with each bite. Whether you’re easing back into cooking or a seasoned home-chef, this tuna melt will have you wondering why you ever reached for fast food. Ready to elevate your sandwich game? Let’s dive in!
Why is this Tuna Melt a Must-Try?
Simplicity at Its Best: Just a few straightforward steps transform simple ingredients into a delicious meal that everyone will love.
High-Protein Delight: Packed with tuna and enriching cheese, you’re getting a protein boost while savoring each bite.
Versatile Variations: Try the low-carb twist by swapping bread for an egg frittata, or add some jalapeños for a spicy kick!
Crowd-Pleasing Comfort: It’s the classic comfort food that brings the whole family together, whether for lunch or a cozy dinner.
Quick and Easy: In under 30 minutes, this tuna melt goes from kitchen to table—ideal for busy weeknights! Pair it with a side of Honey Garlic Carrots or a warm bowl of tomato soup for a complete meal.
Tuna Melt Ingredients
• Here’s everything you need to whip up this comforting Tuna Melt!
For the Base
- Sourdough Bread – Serves as the sturdy foundation; consider gluten-free or paleo options if desired.
- Canned Tuna – The star of the dish; opt for tuna in brine or olive oil for varied flavors.
For the Mixture
- Onion (Small White or Red) – Offers a crunchy bite; swap with scallions for a milder taste.
- Wholegrain Mustard – Adds a tangy depth to the mix; Dijon mustard is a smooth alternative.
- Mayonnaise – Brings creaminess to the filling; Greek yogurt works well for a lighter version.
For Topping
- Grated Cheese (Cheddar, Tasty) – Melts beautifully to give richness; try Swiss or mozzarella if preferred.
- Sea Salt & Ground Black Pepper – Enhances all flavors; adjust to taste.
For Serving
- Gherkins and Sliced Cucumber – Adds a refreshing crunch beside the warm sandwich; perfect for a bright contrast.
Feel free to experiment with these ingredients as you create your delicious Tuna Melt, showcasing both comfort and flavor in every bite!
Step‑by‑Step Instructions for Tuna Melt
Step 1: Pre-toast the Bread
Begin your Tuna Melt by pre-toasting slices of sourdough bread on the lowest toaster setting for about 2-3 minutes. This initial toast helps create a sturdy base that won’t become soggy later. Look for a light golden color—this will enhance the final texture of your sandwich.
Step 2: Preheat the Grill
While the bread is toasting, preheat your grill or broiler to medium-high heat for about 5 minutes. This ensures the perfect heat distribution for melting the cheese evenly. Keep an eye on it; you want it hot enough for a quick grill but not so hot that it burns the cheese.
Step 3: Prepare the Tuna Mixture
In a mixing bowl, combine the drained canned tuna with finely diced onions, mayonnaise, and wholegrain mustard. Mix thoroughly until all ingredients are well incorporated, creating a creamy, well-seasoned filling. This step brings together the rich flavors that make your Tuna Melt truly irresistible.
Step 4: Assemble the Sandwiches
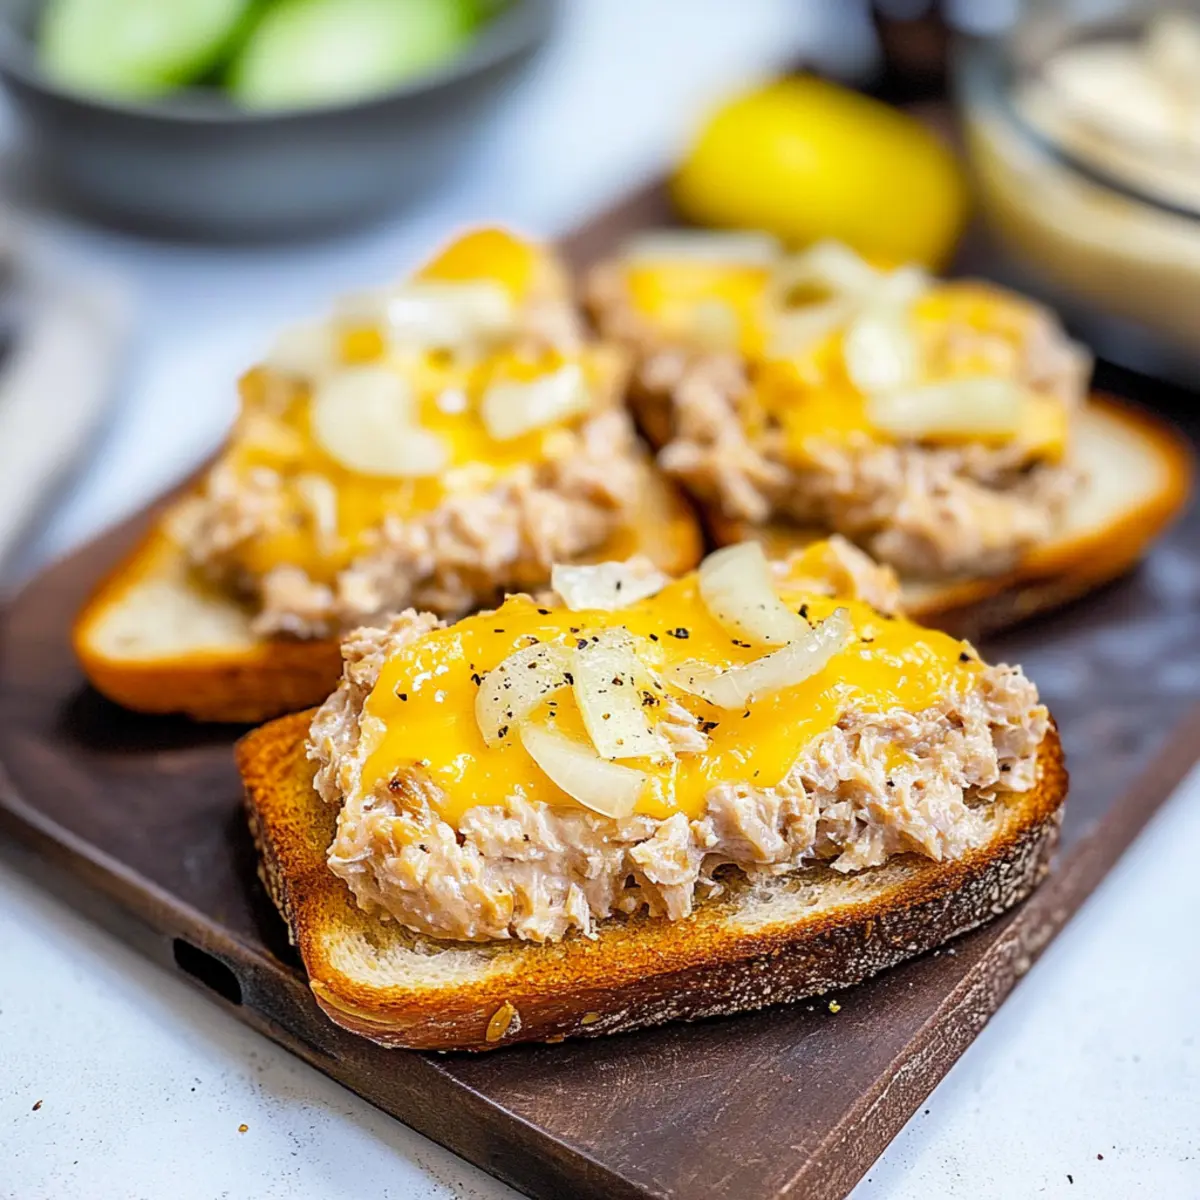
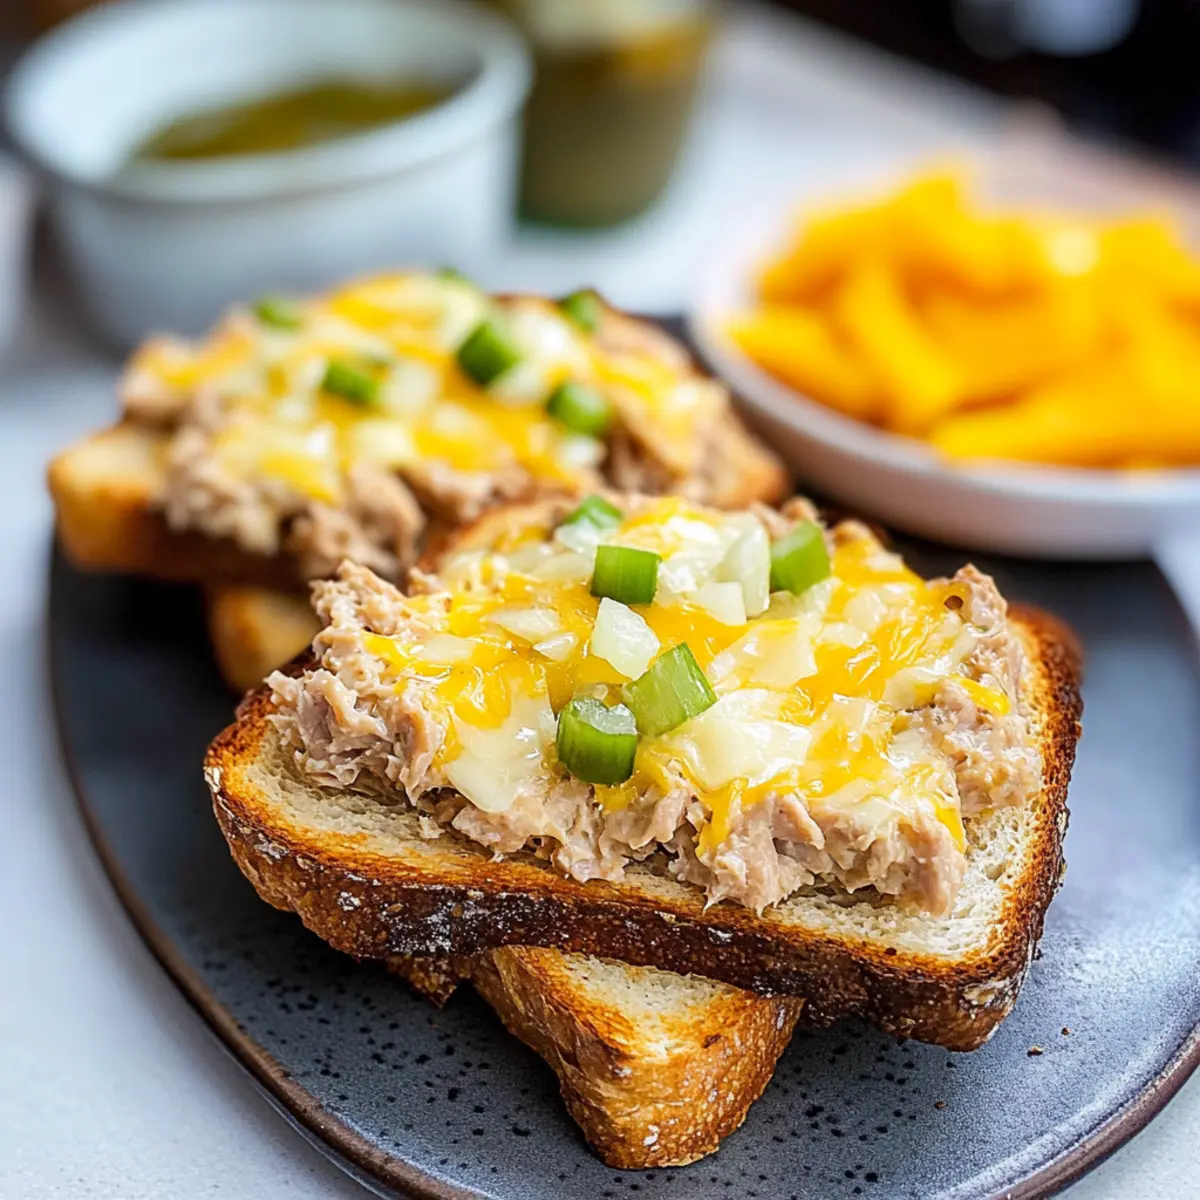
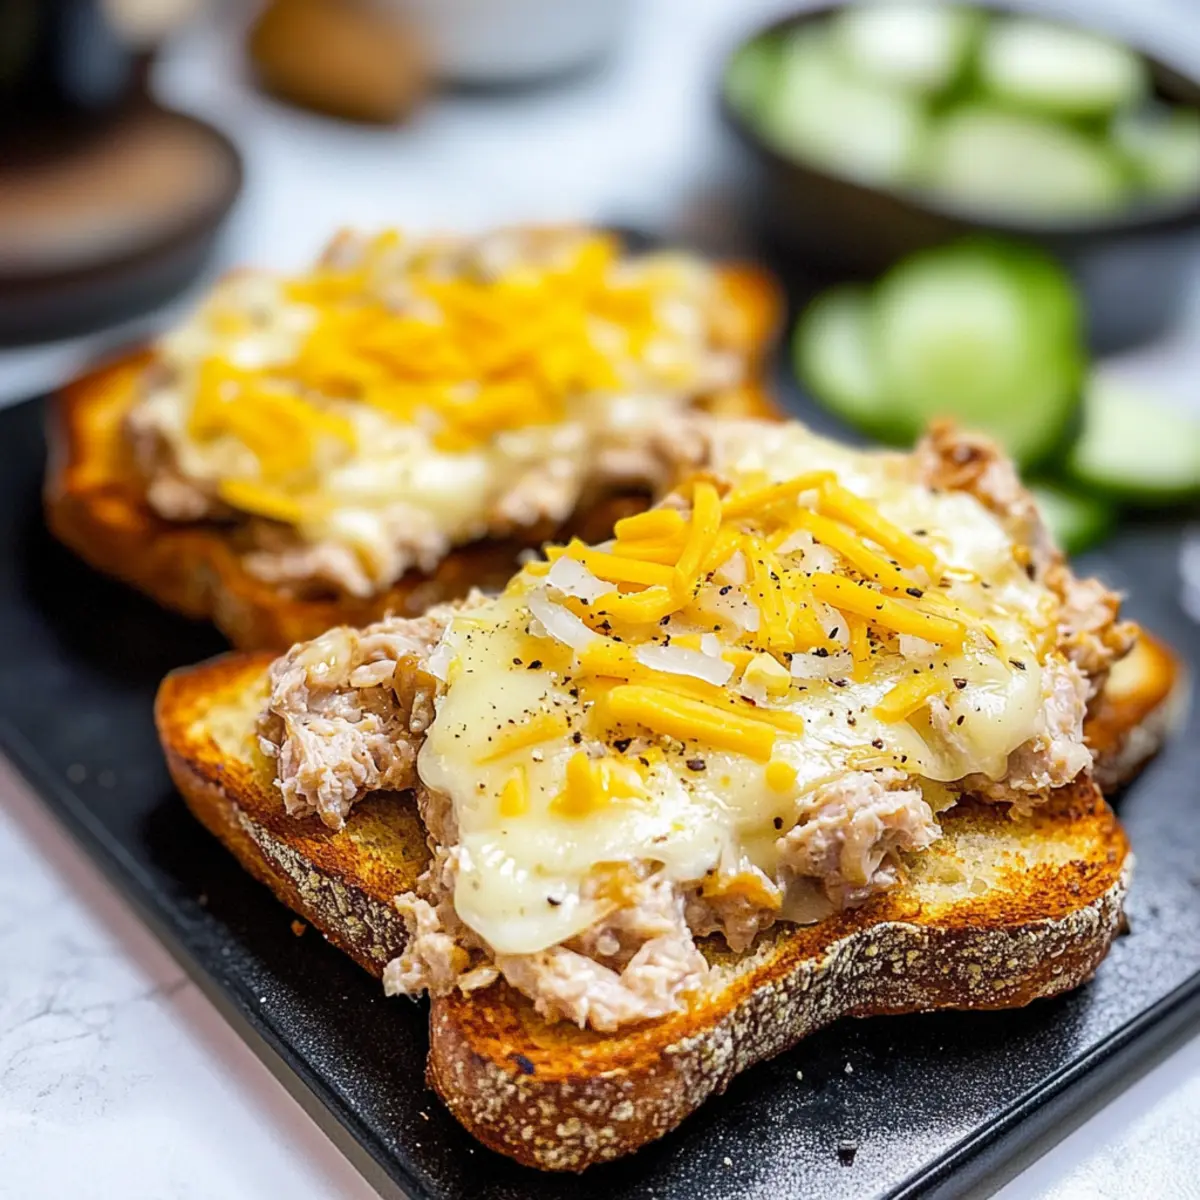
Spread the tuna mixture generously over each piece of toasted sourdough bread. Be sure to reach the edges so each bite is packed with flavor. Next, sprinkle a generous amount of grated cheddar cheese on top of each assembled sandwich, allowing the cheese to melt beautifully during grilling.
Step 5: Grill the Tuna Melts
Carefully place the prepared open-faced sandwiches under the preheated grill for about 3-5 minutes. Watch closely as the cheese melts and turns a lovely golden color; this is your visual cue that it’s time to check for doneness. Remove them when the cheese is bubbling and beautifully melted.
Step 6: Season and Serve
Once grilled, take the Tuna Melts out and let them cool for a minute. Sprinkle sea salt and ground black pepper over the top for added flavor. Serve immediately alongside gherkins and sliced cucumber for a refreshing crunch that complements the creamy goodness of your Tuna Melt.
What to Serve with Tuna Melt?
It’s easy to craft a delightful meal experience when you pair your tuna melt with the right sides that brighten up your table!
-
Fresh Salad: A crisp green salad dressed in lemon vinaigrette cuts through the richness of the melt, offering a refreshing bite.
-
Tomato Soup: The classic combo! A warm bowl of tomato soup provides a comforting dip for your cheesy sandwich—perfect for cooler days.
-
Dill Pickles: The tangy crunch of dill pickles contrasts beautifully with the creaminess of the tuna melt, adding a zesty touch to each bite.
-
Sweet Potato Fries: These slightly sweet, crispy fries complement the savory sandwich perfectly and make for a delightful twist on traditional fries.
-
Sliced Avocado: Creamy avocado adds a silky texture that enhances the overall richness of your meal, making it feel indulgent yet wholesome.
-
Sparkling Lemonade: Quench your thirst with a refreshing glass of sparkling lemonade; its citrusy fizz brightens the entire meal and keeps it light.
Tuna Melt Variations & Substitutions
There’s so much room for creativity in crafting your Tuna Melt!
-
Low-Carb: Replace bread with an egg frittata for a protein-packed alternative. This twist is perfect for those watching their carbs; layer the tuna mixture and cheese right into the fluffy egg base.
-
Spicy Kick: Add diced jalapeños or a drizzle of sriracha into your tuna mixture. This spicy addition can really bring excitement to your classic melt; feel free to balance the heat with a dollop of creamy mayo.
-
Flavor Boost: Mix in some chopped fresh herbs like dill or parsley for a fresh twist. Herbs can brighten up the richness of the tuna and cheese, transforming your melt into something extraordinary.
-
Vegan Swap: Substitute canned tuna with chickpeas or mashed avocado for a plant-based option. Both surfaces offer unique textures and flavors; seasoned well, they’ll make a satisfying alternative.
-
Cheese Variety: Use a mix of cheeses like Gruyère and mozzarella for an exciting flavor combo. Combining different cheeses can elevate that gooey delight, offering a delightful melty experience.
-
Bread Alternatives: Try slices of whole grain or even cauliflower bread for a nutritious twist. Both options provide great flavor and texture with fewer calories, perfect for health-conscious cooks.
-
Add Crunch: Toss in some sliced gherkins or pickled red onions before grilling. The tangy crunch plays harmoniously with the soft, creamy filling, creating a contrast that’s sure to please.
-
Serving Idea: Pair with a bowl of warm tomato soup for a delightful meal. The classic pairing enhances the comfort food vibe, making every bite even more satisfying—just like with my Orange Croissant Breakfast Bake!
Feel free to mix and match these variations to suit your cravings and dietary needs. Enjoy your comforting, customized Tuna Melt adventure!
Make Ahead Options
These Tuna Melts are perfect for meal prep and can save you time on busy weeknights! You can prepare the tuna mixture (tuna, onions, mayonnaise, and mustard) up to 3 days in advance and store it in an airtight container in the refrigerator. This way, the flavors meld beautifully without losing quality. Just remember to assemble the sandwich right before grilling, as this ensures the sourdough stays crunchy and fresh. When you’re ready to enjoy, pre-toast your bread and top it with the chilled tuna mixture and grated cheese, then grill for a few minutes until the cheese is bubbly and golden. With these tips, you’ll have a quick, satisfying meal that feels homemade every time!
How to Store and Freeze Tuna Melt
Fridge: Store leftover tuna melts in an airtight container for up to 3 days. To maintain the best flavor, reheat gently in the oven to preserve the crunchy texture.
Freezer: For freezing, separate the tuna mixture from the bread and place it in a freezer-safe container for up to 2 months. Thaw in the fridge before assembling and grilling.
Reheating: When ready to enjoy, reheat the assembled tuna melts in the oven at 350°F (175°C) for about 10-15 minutes or until heated through, ensuring the cheese melts perfectly again.
Make-Ahead Tip: You can prepare the tuna mixture ahead of time and store it in the fridge for up to 4 days, making your meal prep even easier!
Expert Tips for the Best Tuna Melt
-
Perfect Toasting: Start by pre-toasting your sourdough at a low setting to create a sturdy base that won’t become soggy when topped.
-
Cheese Melting Magic: Use a medium-high grill setting for even melting. Keep a close eye to prevent burning; golden cheese is the goal for your Tuna Melt.
-
Seasoning Balance: Add sea salt and black pepper after grilling to enhance flavor without losing the cheese’s creamy texture. Adjust to personal tastes for the best results.
-
Low-Carb Twist: If you’re going for a lower-carb option, consider making an egg frittata instead of using bread, layering it with the tuna mixture and cheese for a deliciously unique take.
-
Ingredient Swaps: Don’t hesitate to experiment! Try swapping wholegrain mustard for Dijon or mixing in some diced pickles for an extra flavor kick in your Tuna Melt.
Tuna Melt Recipe FAQs
What type of bread is best for my Tuna Melt?
Absolutely! Sourdough is great for its chewiness and sturdiness, but feel free to try whole grain or gluten-free bread if preferred. Just ensure that whatever bread you choose can hold up to the creamy tuna mixture.
How can I store leftover Tuna Melts?
You can store leftover tuna melts in an airtight container in the fridge for up to 3 days. To preserve texture, I recommend reheating them gently in the oven to maintain that delightful crunch.
Can I freeze my Tuna Melt?
Yes! For freezing, I suggest separating the tuna mixture from the bread. Place the tuna in a freezer-safe container for up to 2 months. When you’re ready to enjoy, simply thaw it in the fridge before assembling and grilling.
What can I do if my cheese isn’t melting properly?
No worries! First, ensure your grill is preheated adequately. If the cheese isn’t melting as desired, consider covering your Tuna Melt with aluminum foil while grilling; this traps heat and helps the cheese melt evenly. Also, using freshly grated cheese instead of pre-packaged can make a big difference!
Are there any allergy considerations I should keep in mind?
Certainly! If you have allergies, be cautious with canned tuna (check for any cross-contamination) and mayonnaise. For a lighter alternative, try Greek yogurt. Always customize your ingredients based on your dietary needs and preferences.
How long does the tuna mixture last in the fridge?
You can keep the tuna mixture in an airtight container in the fridge for up to 4 days. Just mix it well before using again, and don’t forget to check for freshness!

Ultimate Tuna Melt Recipe: Quick, Creamy, and Satisfying
Ingredients
Equipment
Method
- Pre-toast slices of sourdough bread on the lowest toaster setting for about 2-3 minutes.
- Preheat your grill or broiler to medium-high heat for about 5 minutes.
- In a mixing bowl, combine drained canned tuna with finely diced onions, mayonnaise, and wholegrain mustard.
- Spread the tuna mixture generously over each piece of toasted sourdough bread.
- Sprinkle a generous amount of grated cheddar cheese on top of each assembled sandwich.
- Place the prepared open-faced sandwiches under the preheated grill for about 3-5 minutes.
- Once grilled, sprinkle sea salt and ground black pepper over the top for added flavor.
- Serve immediately alongside gherkins and sliced cucumber.
Leave a Reply