
There’s something magical about the scent of garlic wafting through the kitchen, isn’t there? It instantly transports me to that cozy café where I first discovered the joy of a Cheesy Garlic Cruffin. With its flaky layers hugging a melty, cheesy center, this delicacy is not only a delightful snack but also a savory breakfast option that feels indulgent yet achievable. I love how it bridges the gap between comfort food and a gourmet experience—all while being simple enough to whip up at home. You’ll savor every bite, whether you enjoy them fresh from the oven with a crisp salad or dunked into a warm bowl of soup. Curious to bring this delicious experience to your table? Let’s dive into making these irresistible cruffins together!
Why is Cheesy Garlic Cruffin a must-try?
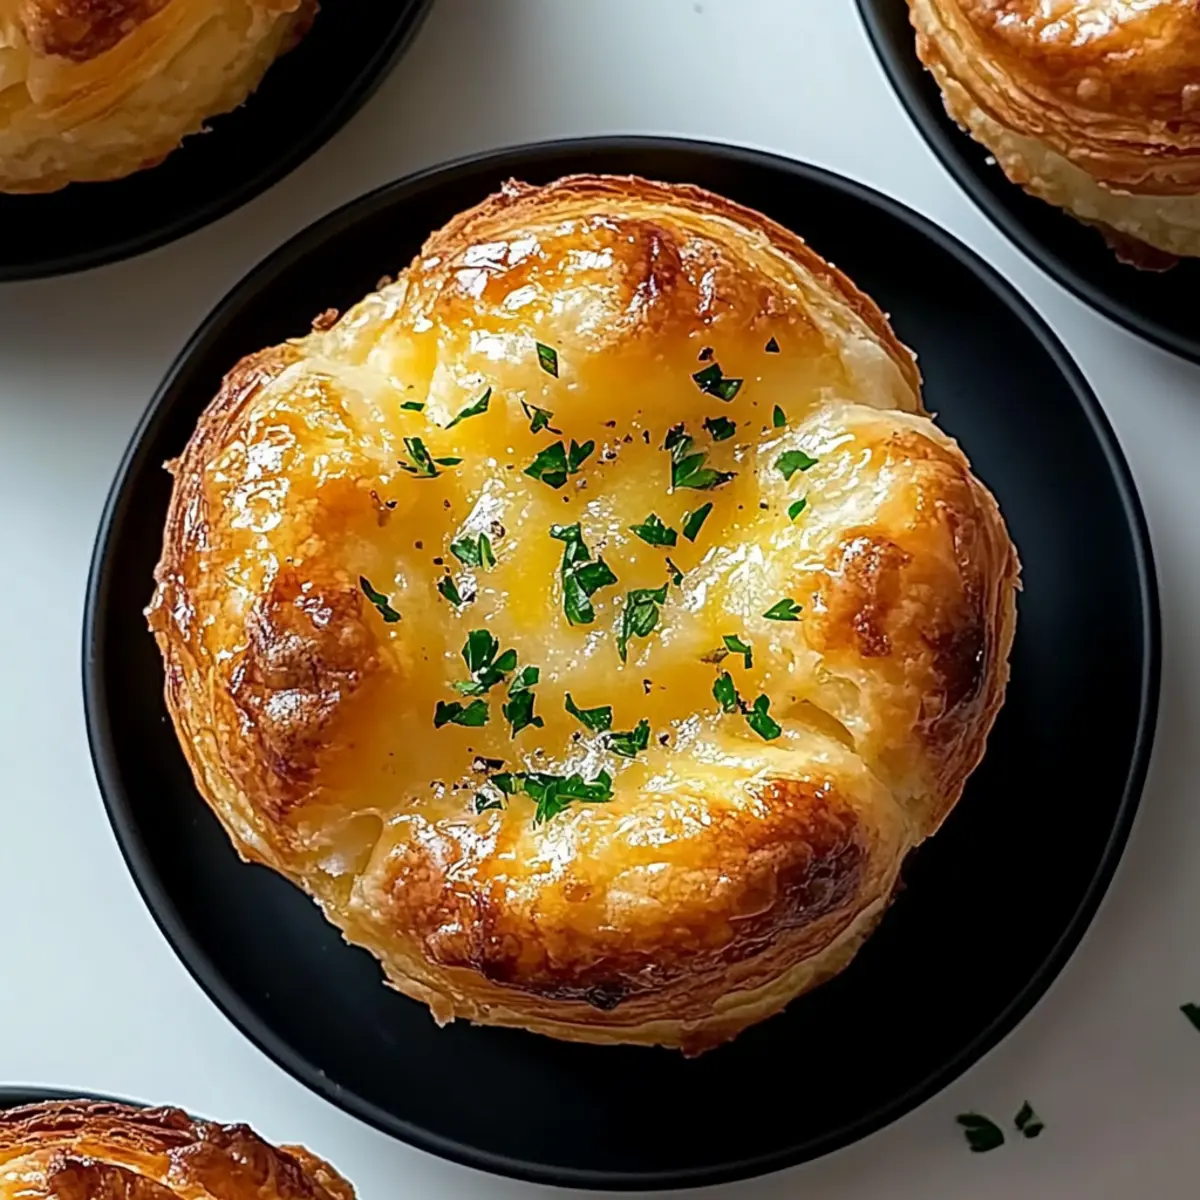
Irresistible Layers: The flaky layers of this cruffin offer a unique texture that perfectly contrasts with the gooey, cheesy center.
Savory Goodness: A delightful blend of Parmesan and mozzarella, paired with aromatic garlic, makes each bite bursting with flavor.
Gourmet at Home: You can impress friends and family without needing culinary expertise; these cruffins elevate your breakfast or snack game effortlessly!
Versatile Pairing: Enjoy them fresh out of the oven or paired with a crisp salad or warm bowl of soup for an unforgettable meal.
Quick and Simple: With just a few ingredients and straightforward steps, you won’t find yourself slaving away in the kitchen.
Get ready to indulge in this savory delight!
Cheesy Garlic Cruffin Ingredients
For the Dough
- All-purpose flour – Provides structure; substitute with gluten-free flour for a gluten-free version.
- Granulated sugar – Adds slight sweetness to balance flavors.
- Salt – Enhances overall flavor; keep as is for optimal taste.
- Instant yeast – Leavens the dough; ensure it’s fresh for best results.
- Warm milk – Hydrates and helps activate the yeast; use non-dairy milk for a dairy-free option.
- Unsalted butter (melted) – Adds richness and flavor.
- Warm water – Adjusts dough consistency; must be warm, not hot, to avoid killing the yeast.
- Large egg – Binds ingredients and adds richness.
For the Filling
- Grated Parmesan cheese – Adds umami and a savory flavor; substitute with Asiago for a sharper taste.
- Shredded mozzarella cheese – Provides a stretchy, melty texture; alternatively, use gouda for a smoky flavor.
- Minced garlic – Infuses the filling with aromatic flavor; adjust quantity according to taste.
- Unsalted butter (softened) – Used in the garlic filling for a rich spread.
- Fresh parsley (chopped) – Adds a fresh, herbal note to the filling.
Get ready to create your own delightful Cheesy Garlic Cruffin that will have everyone coming back for more!
Step‑by‑Step Instructions for Cheesy Garlic Cruffin
Step 1: Combine Dry Ingredients
In a large mixing bowl, whisk together 3 cups of all-purpose flour, 2 tablespoons of granulated sugar, 1 teaspoon of salt, and 2 teaspoons of instant yeast. This creates the foundation for your Cheesy Garlic Cruffin. Ensure the yeast is fresh for an optimal rise, and use a whisk to incorporate air into the mixture for a fluffier dough.
Step 2: Activate the Dough
Create a well in the center of your dry ingredients, then pour in 1 cup of warm milk (about 110°F), 4 tablespoons of melted unsalted butter, and 1/4 cup of warm water. Gently mix these ingredients with a wooden spoon until a shaggy dough forms. Make sure the liquids are warm, not hot, to protect the yeast’s effectiveness.
Step 3: Add the Egg and Mix
Crack 1 large egg into the dough mixture and stir it in until fully integrated. This step adds richness to your Cheesy Garlic Cruffin dough. At this point, the mixture will come together, creating a soft and slightly sticky dough that should pull away from the sides of the bowl as you mix.
Step 4: Knead the Dough
Transfer the dough onto a lightly floured surface and knead for about 8 to 10 minutes until it feels smooth and elastic. You can tell it’s ready when it springs back when poked gently. Kneading helps develop gluten, which is crucial for that wonderful texture in your cruffins.
Step 5: First Rise
Place the kneaded dough in a greased bowl, cover it with a clean kitchen towel, and let it rise in a warm, draft-free space for about 1 hour, or until it has doubled in size. This is where the magic happens! You’ll know it’s ready when it looks fluffy and puffs up significantly.
Step 6: Prepare the Filling
While the dough rises, mix together 1/2 cup of softened unsalted butter, 4 cloves of minced garlic, and 1/4 cup of chopped fresh parsley in a small bowl. This savory garlic filling will infuse your Cheesy Garlic Cruffin with irresistible flavor. Stir until well combined, creating a smooth, herb-infused spread.
Step 7: Preheat the Oven
About 15 minutes before the dough is finished rising, preheat your oven to 375°F (190°C) and grease a standard muffin tin with non-stick spray or butter. This ensures your cruffins will come out easily after baking and helps them develop a beautiful golden crust.
Step 8: Roll Out the Dough
Once your dough has finished rising, turn it out onto a floured surface and roll it into a large rectangle, about 1/4 inch thick. Spread the garlic mixture evenly across the surface, ensuring every inch is covered to maximize flavor in every Cheesy Garlic Cruffin.
Step 9: Add Cheese and Shape
Sprinkle 1/2 cup of grated Parmesan cheese and 1 cup of shredded mozzarella evenly over the spread. Starting from one long edge, roll the dough tightly into a log shape. Then slice the log into 12 equal pieces with a sharp knife, making sure each piece is filled with that cheesy goodness.
Step 10: Position in Muffin Tin
Place each dough piece vertically into the greased muffin tin, ensuring they are snug but not overly cramped. Cover the muffin tin with a kitchen towel and let them rest for another 20 minutes, allowing them to rise slightly and gain some volume for a deliciously fluffy cruffin.
Step 11: Bake the Cruffins
Remove the towel and bake your Cheesy Garlic Cruffin in the preheated oven for 20 to 25 minutes, or until they are golden brown and puffed up. Keep an eye on them during the last few minutes to achieve that perfect color while also filling the kitchen with a delightful aroma.
Step 12: Cool and Serve
Once baked, let the cruffins cool in the tin for about 5 minutes, then transfer them to a wire rack to cool slightly. This step helps them set and develop a nice crust. Serve warm and delight in the flaky layers and gooey cheese, enjoying them fresh for an unforgettable experience!

Make Ahead Options
These Cheesy Garlic Cruffins are perfect for busy home cooks looking to save time without sacrificing flavor! You can prepare the dough and filling up to 24 hours in advance. Simply follow the steps up until shaping the cruffins, then cover the assembled dough pieces with plastic wrap and refrigerate. When you’re ready to bake, let them sit at room temperature for about 20 minutes before popping them in the oven. This method ensures your cruffins maintain their fluffy texture and cheesy goodness, so you’ll enjoy that freshly baked experience with minimal effort during your busy week!
How to Store and Freeze Cheesy Garlic Cruffin
Room Temperature: Keep your cruffins in an airtight container at room temperature for up to 2 days to maintain their flaky texture.
Fridge: For longer storage, refrigerate the cruffins. They can last up to a week; just be sure to wrap them properly to prevent them from drying out.
Freezer: If you’ve made a batch ahead of time, freeze cruffins in a single layer for about 1 hour, then transfer to a labeled zip-top bag for up to 3 months.
Reheating: To enjoy, reheat frozen cruffins directly from the freezer in a preheated oven at 350°F (175°C) for about 10–15 minutes for that fresh-out-of-the-oven taste.
Expert Tips for Cheesy Garlic Cruffin
• Yeast Activity: Always test your instant yeast by mixing it with warm water and sugar; if it foams, it’s active. If not, it’s best to use fresh yeast for your Cheesy Garlic Cruffin.
• Room Temperature: Use room temperature ingredients wherever possible, such as milk and eggs, to ensure a smooth dough texture and better rise.
• Kneading Technique: Knead the dough until it’s elastic and smooth. Avoid over-kneading, which can make the cruffins tough instead of light and fluffy.
• Resting Period: Don’t skip the resting times; they contribute to the flakiness and lift of your Cheesy Garlic Cruffin. Ensure they rest in a warm environment!
• Flavor Variations: Feel free to experiment! Add fresh herbs or switch up cheeses to customize the flavor of your cruffins while keeping that delightful cheesy core.
What to Serve with Cheesy Garlic Cruffin
Elevate your meal experience with delightful accompaniments that complement the savory goodness of fresh Cheesy Garlic Cruffin.
- Crisp Green Salad: A fresh salad, layered with crunchy vegetables and a zesty dressing, brightens the rich flavors of the cruffins.
- Creamy Tomato Soup: Pairing with a warm, creamy tomato soup creates a comforting combination, perfect for dipping those flaky layers.
- Savory Quiche: A slice of savory quiche adds a delightful contrast in texture while enhancing the breakfast vibe of your cruffins.
- Roasted Vegetables: Oven-roasted seasonal veggies provide a healthy, colorful side that balances the richness of the cruffins beautifully.
- Garlic Butter Pasta: A light garlic butter pasta can transform your meal into an indulgent feast, harmonizing flavors without overpowering.
- Herbed Yogurt Dip: Serve with a tangy herbed yogurt dip for a refreshing contrast, perfect for enhancing each cheesy bite.
- Chilled White Wine: A glass of chilled white wine—like Sauvignon Blanc—brings out the savory elements of your Cheesy Garlic Cruffin nicely.
- Fresh Fruit Platter: For dessert, a platter of fresh, seasonal fruits balances the savory notes with sweetness, offering a refreshing finish.
Cheesy Garlic Cruffin Variations
Feel free to get creative and make this Cheesy Garlic Cruffin your own with these delightful twists!
- Gluten-Free: Use a 1:1 gluten-free flour blend to keep the flaky texture without the gluten.
- Different Cheeses: Swap in gouda or aged cheddar for distinct flavor profiles and richness.
- Herb-Infused: Mix in fresh herbs like thyme or rosemary with the garlic for added aroma and depth.
- Spicy Kick: Add crushed red pepper flakes or diced jalapeños to your filling for an exciting heat boost.
- Veggie Delight: Incorporate sautéed spinach or caramelized onions into the filling for extra nutrition and flavor.
- Sweet Touch: Drizzle with a touch of honey before serving to contrast the savory garlic and cheese beautifully.
- Extra Garlic: For true garlic lovers, roast the garlic cloves before mixing them into the filling for a sweeter, mellow taste.
- Herbed Butter: Instead of plain butter, mix in garlic and herb compound butter for a luscious spread.
To serve these cruffins, why not pair them with some Honey Garlic Carrots for a delightful crunch or some Garlic Butter Dinner Rolls that perfectly complement the cheesy goodness inside? Happy cooking!

Cheesy Garlic Cruffin Recipe FAQs
What type of flour should I use for Cheesy Garlic Cruffin?
Absolutely! I recommend using all-purpose flour for the perfect structure. If you need a gluten-free option, you can substitute it with a gluten-free flour blend; just ensure it contains a binding agent like xanthan gum.
How should I store baked Cheesy Garlic Cruffin?
For the best taste, keep your cruffins in an airtight container at room temperature for up to 2 days. If you wish to store them longer, refrigerate them in a well-sealed container for up to a week.
Can I freeze Cheesy Garlic Cruffin?
Yes, you can! To freeze, place the cooled cruffins in a single layer on a baking sheet for about 1 hour. After they are firm, transfer them to a labeled zip-top freezer bag. They can be frozen for up to 3 months.
What should I do if my dough doesn’t rise properly?
If your dough doesn’t rise well, check the warmth of your environment. It should ideally be in a warm, draft-free area. Alternatively, you can put your dough in an oven preheated to a low temperature (around 100°F or 38°C) with the oven turned off. Let it rise until doubled in size.
Are there any dietary considerations for Cheesy Garlic Cruffin?
Sure! If you have a dairy allergy, substitute dairy ingredients like milk and butter with non-dairy alternatives. Also, be cautious with garlic if you have a sensitivity. For those with gluten sensitivity, using a gluten-free flour will still yield tasty results!
How long can I keep the filling in the fridge before using it in my Cheesy Garlic Cruffin?
The garlic and butter filling can be stored in an airtight container in the fridge for 3 to 4 days. If making ahead, I often prepare the filling and store it, allowing the flavors to meld beautifully before using it when I’m ready to bake my cruffins.

Cheesy Garlic Cruffin – Flaky Layers of Savory Delight
Ingredients
Equipment
Method
- Combine dry ingredients: whisk together flour, sugar, salt, and yeast.
- Activate the dough: mix warm milk, melted butter, and warm water into the dry mixture.
- Add the egg and mix until fully integrated.
- Knead the dough until smooth and elastic for about 8-10 minutes.
- Place the dough in a greased bowl, cover it, and let it rise for about 1 hour.
- Prepare the filling by mixing softened butter, minced garlic, and chopped parsley until smooth.
- Preheat oven to 375°F (190°C) about 15 minutes before the dough is done rising.
- Roll out the dough into a large rectangle and spread the garlic mixture over it.
- Add cheese: sprinkle grated Parmesan and shredded mozzarella over the spread.
- Shape the cruffins by rolling the dough log and cut into 12 pieces.
- Position each piece in the greased muffin tin and let rest for 20 minutes.
- Bake cruffins in the oven for 20-25 minutes until golden brown.
- Let cool for 5 minutes, then transfer to a wire rack and serve warm.
Leave a Reply