
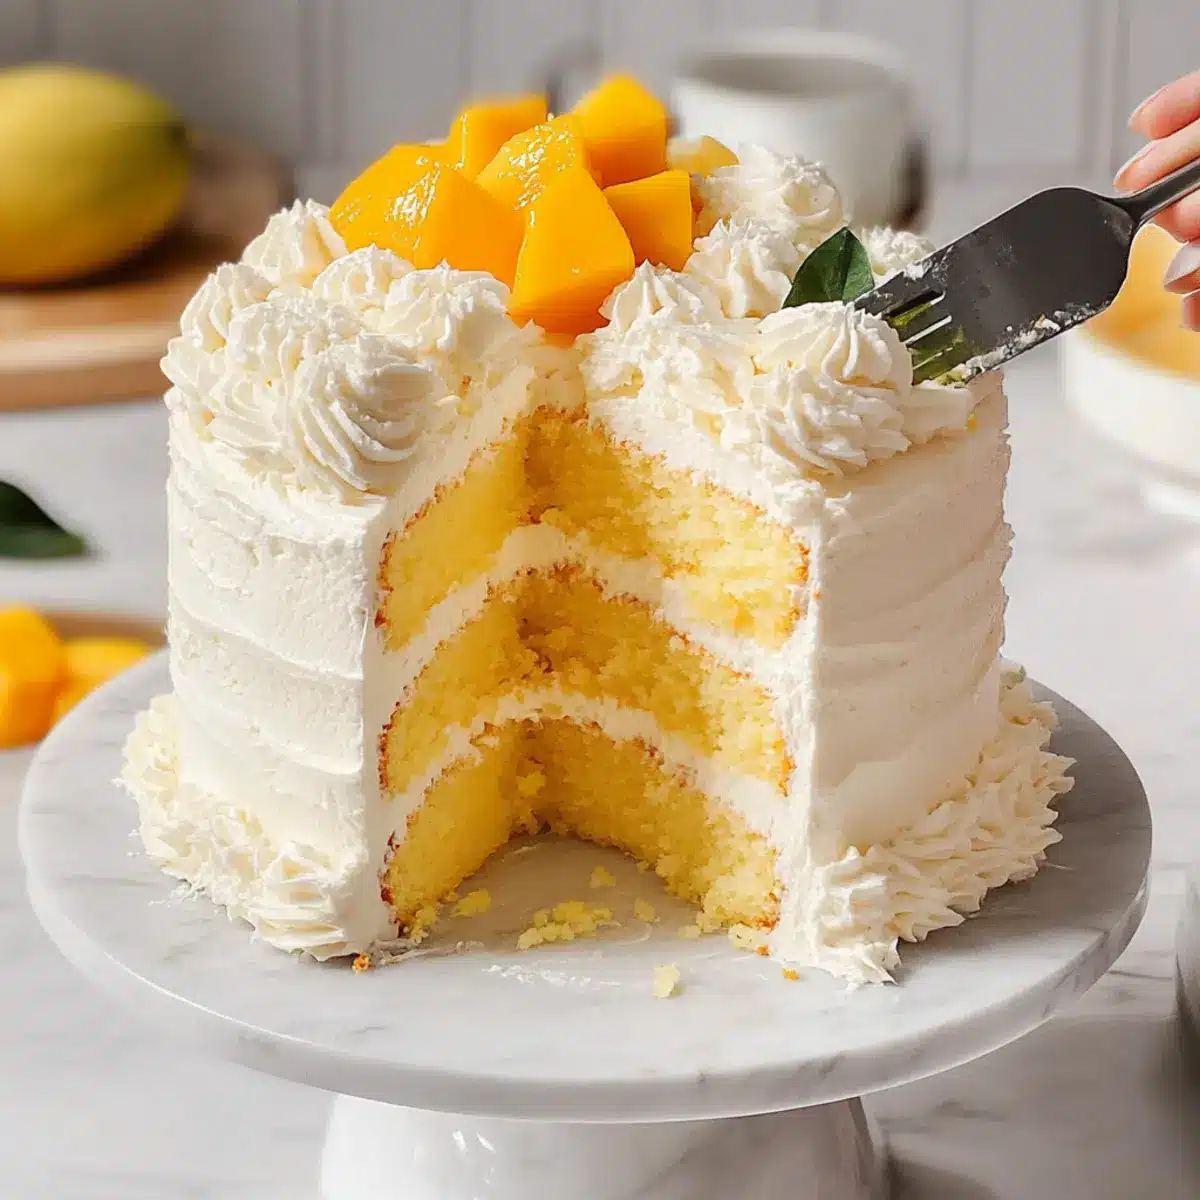
As the golden sun sets on a warm summer day, I can’t help but think of the perfect dessert to capture the magic of the season. Enter the Asian Bakery-Style Mango Cake—a delightful treat that features airy chiffon layers and luscious, juicy mango filling. This recipe strikes just the right balance between sweetness and tropical bliss, making it a go-to choice for anyone seeking a light and refreshing cake. Plus, with its simple preparation and customizability, it’s a fantastic way to impress guests or indulge your own craving for something sweet. Are you ready to bring a slice of sunshine to your kitchen?
Why is this Mango Cake unforgettable?
Lightness: The fluffy chiffon layers melt in your mouth, providing a delightful texture that won’t weigh you down.
Tropical Bliss: Fresh, juicy mango filling elevates this cake, making it a perfect summer treat that bursts with natural sweetness.
Easy to Customize: Want to switch it up? Substitute other fruits or add layers of lemon curd for an exciting twist!
Impressive Presentation: With its beautiful layers and light whipped cream frosting, this cake becomes the star of any gathering, leaving guests in awe.
Crowd-Pleasing: This cake is a refreshing alternative to traditional desserts, making it a hit at summer parties where everyone craves something cool and fruity.
Mango Cake Ingredients
Discover the perfect ingredients for an unforgettable Mango Cake!
For the Cake
- Cake Flour – Essential for a light texture, substitute with all-purpose flour while adjusting for density.
- Baking Powder – Necessary for the cake to rise; no substitutions recommended.
- Eggs – Both whites and yolks bring airiness—make sure they’re at room temperature for the best results.
- Cream of Tartar – Stabilizes egg whites; you can replace it with lemon juice in a pinch.
- Sugar – Adds sweetness and moisture; feel free to use a baking-appropriate sweetener if desired.
- Salt – Enhances flavor; skip for low-sodium diets if needed.
- Milk – Provides moisture; almond milk makes a great dairy-free alternative.
- Vanilla Extract – The flavor booster; opt for pure vanilla for the best taste.
- Vegetable Oil – Keeps the cake moist; melted coconut oil is a flavorful substitute.
For the Whipped Topping
- Heavy Whipping Cream – Essential for a light, fluffy frosting; no substitutions here!
- Powdered Sugar – Sweetens the cream; regular sugar is a possible substitute, but it may alter the texture.
For the Mango Filling
- Mangoes – Fresh and ripe for the sweetest flavor; don’t skimp on this key ingredient in your Mango Cake!
Step‑by‑Step Instructions for Mango Cake
Step 1: Preheat Oven and Prepare Pans
Preheat your oven to 350°F (175°C). While it warms up, line three 6-inch cake pans with parchment paper, making sure not to grease them. This allows the cake to rise beautifully without additional oils interfering with the airy chiffon layers.
Step 2: Mix Dry Ingredients
In a large mixing bowl, sift together the cake flour and baking powder until they are well combined and airy. This crucial step helps create the delicate texture of the Mango Cake. Set the dry mixture aside while you prepare the wet ingredients.
Step 3: Make Meringue
Using a clean mixing bowl, whip the egg whites until they become frothy. Gradually add 1/3 of the sugar along with the cream of tartar, continuing to whip until stiff peaks form. This meringue creation is key to achieving that light, airy structure in your cake layers.
Step 4: Prepare Egg Yolk Mixture
In another bowl, whip the egg yolks, remaining sugar, salt, milk, and vanilla extract together until the mixture is creamy and fluffy. Look for the ribbon stage, where the batter holds its shape for about 3-4 seconds when the whisk is lifted. This will add richness to your Mango Cake.
Step 5: Combine Mixtures
Gently fold the dry ingredients into the egg yolk mixture in small increments, ensuring everything is well combined without over-mixing. After that, carefully add the meringue in three parts, folding gently to maintain the airiness from the whipped egg whites. This step is crucial for fluffy layers.
Step 6: Bake
Divide the batter evenly among the prepared pans. Bake in the preheated oven for 20-22 minutes, or until a toothpick inserted in the center comes out clean. Once baked, allow the cakes to cool in the pans for about 10 minutes before transferring them to a wire rack to cool completely.
Step 7: Whip the Cream
In a large mixing bowl, beat the heavy whipping cream along with powdered sugar and vanilla extract until medium-stiff peaks form. This whipped cream will be your luscious frosting, so chill it in the fridge until you are ready for assembly.
Step 8: Layer the Cake
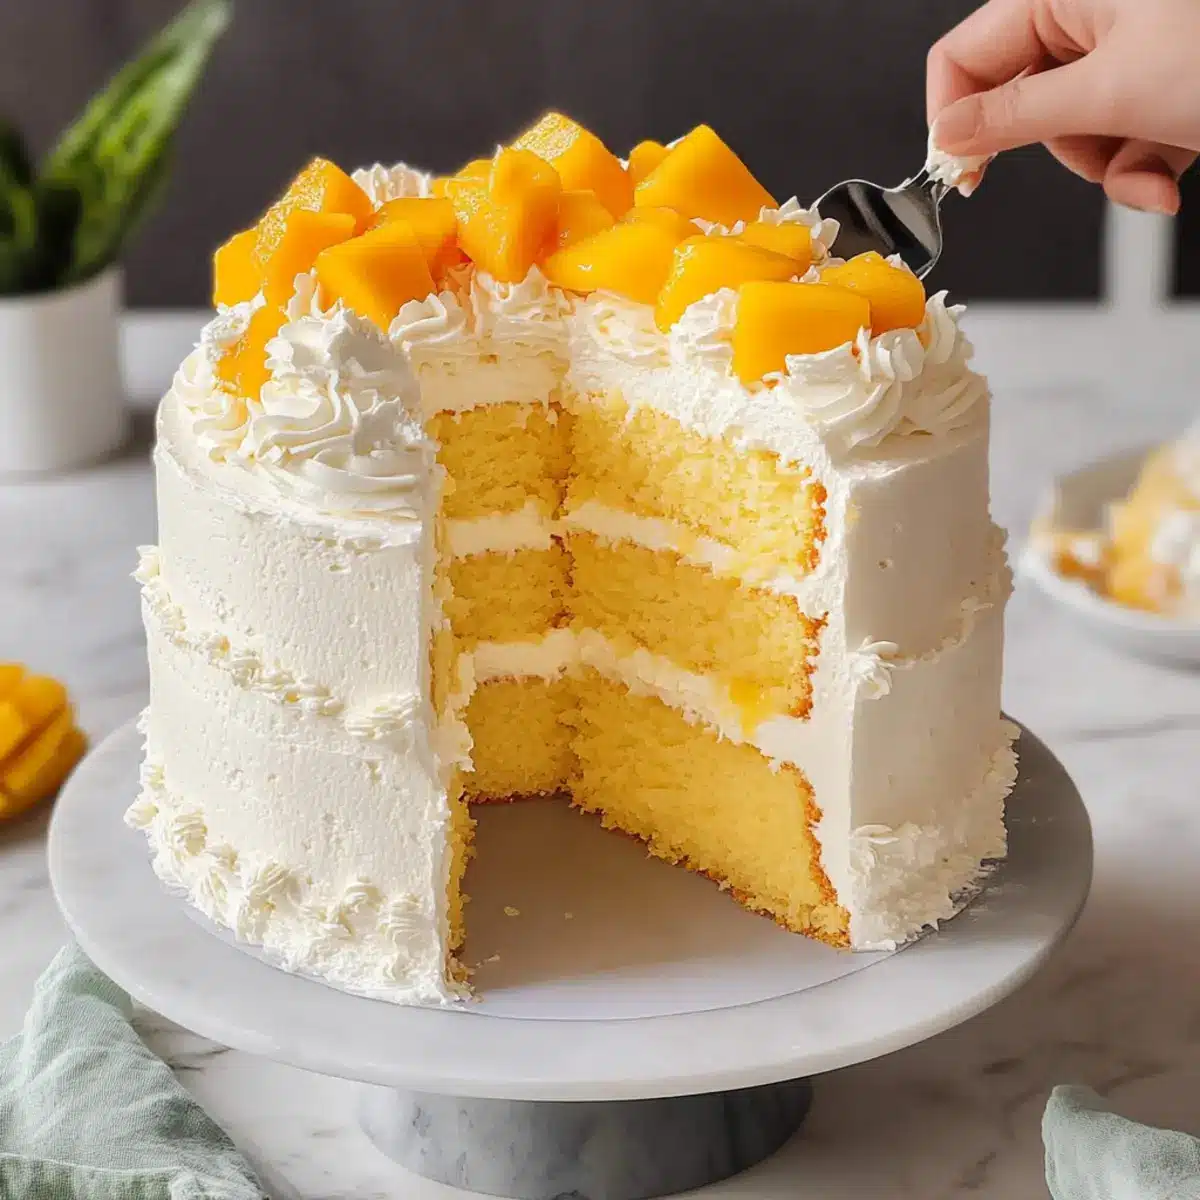
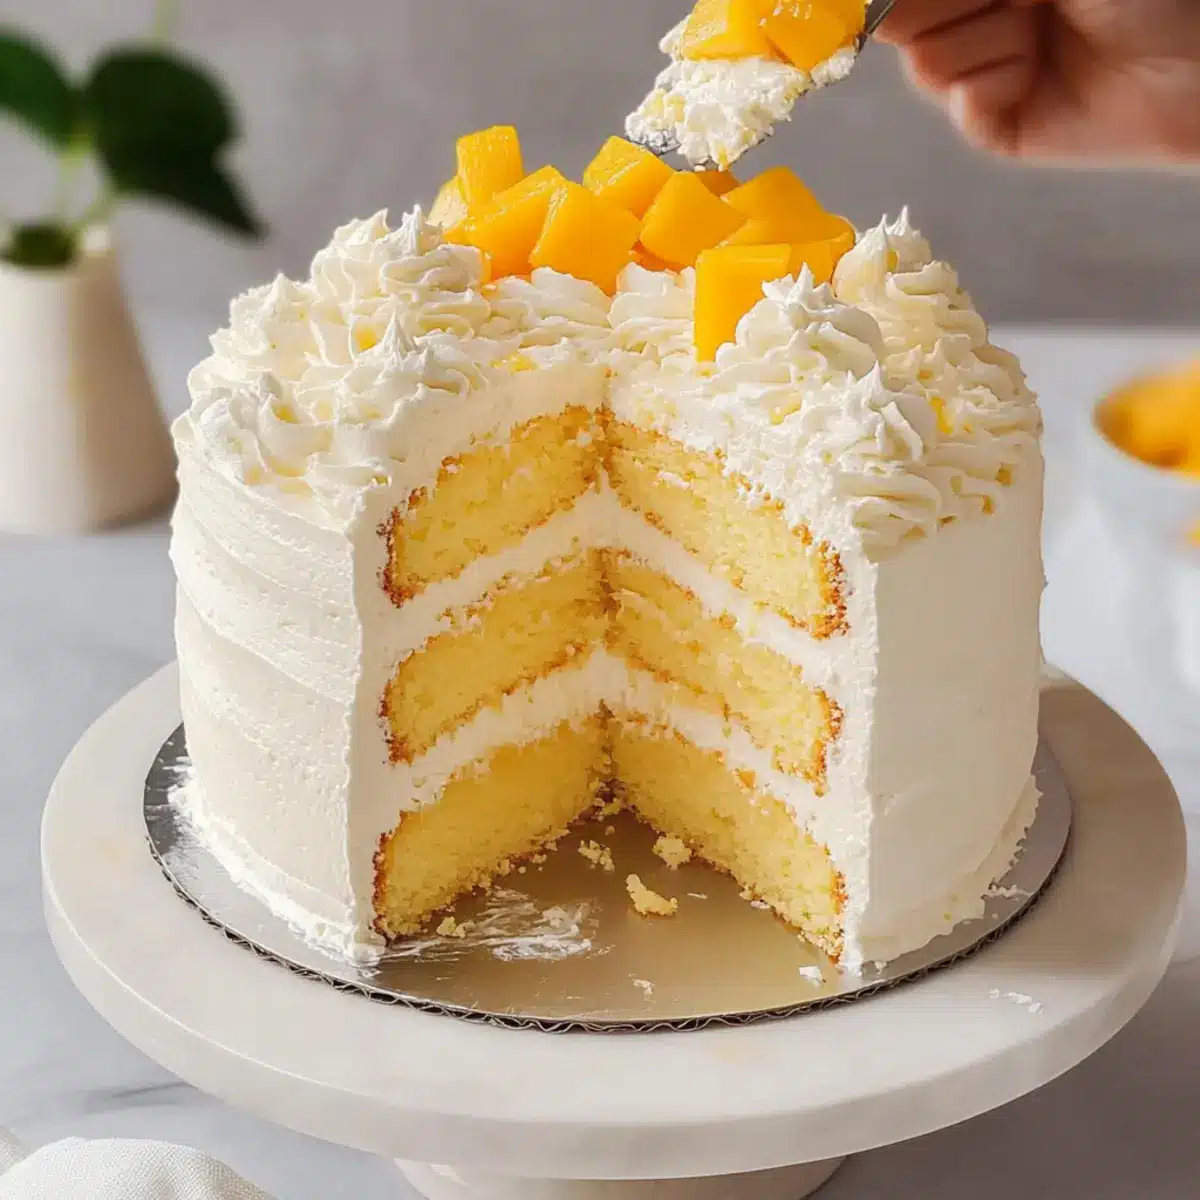
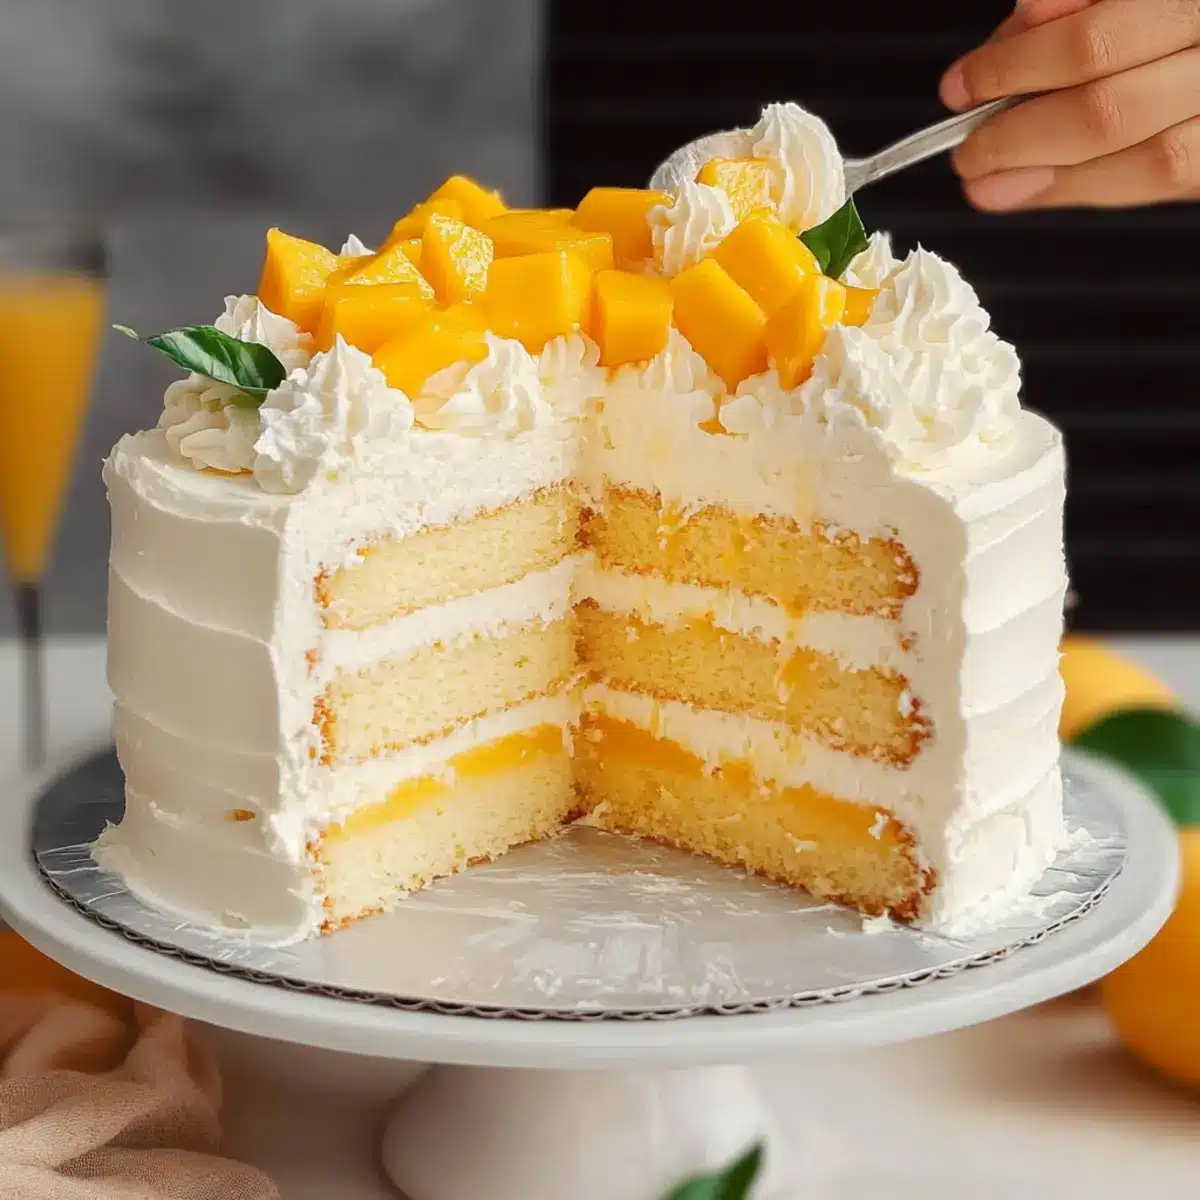
Once your chiffon layers have cooled completely, stack them by spreading a layer of the whipped cream and mango chunks between each. Repeat this until all layers are stacked, showcasing that beautiful mango filling with every slice of your Mango Cake.
Step 9: Decorate
Apply a thin crumb coat of whipped cream over the entire cake to seal in any loose crumbs. Chill it for a brief 15-20 minutes, then follow with a generous final layer of whipped cream. Feel free to add decorative piping and a few mango chunks on top for a stunning finish.
Step 10: Chill
Place your beautifully assembled Mango Cake in the refrigerator for 1-2 hours before serving. This cooling period allows the wooden structure to set and the flavors to meld together, ensuring every bite is as refreshing and delightful as intended.
Expert Tips for Mango Cake
-
Room Temperature Eggs: Ensure your eggs are at room temperature for better whipping and a lighter batter, contributing to the airy structure of the Mango Cake.
-
Gentle Folding: When incorporating the meringue, fold gently to avoid deflating the batter. Over-mixing can lead to a denser cake, so be patient during this step.
-
Check for Stiff Peaks: Whip your egg whites until they reach stiff peaks; this is crucial for that fluffy texture in your cake.
-
Chill for Best Results: After assembling the cake, let it chill for 1-2 hours. This helps the layers firm up and makes cutting easier.
-
Fresh Fruit Matters: Use ripe, fresh mangoes for filling to enhance the natural sweetness and flavor of your Mango Cake, creating a truly refreshing dessert.
How to Store and Freeze Mango Cake
Fridge: Store the mango cake in an airtight container in the refrigerator for up to 3 days. This keeps the cake moist and fresh, preserving its delightful flavor.
Freezer: Avoid freezing the mango cake as the whipped cream frosting may become watery upon thawing, compromising the cake’s texture and taste.
Reheating: If you prefer to enjoy the mango cake slightly warm, you can briefly microwave individual slices for 10-15 seconds, but be cautious not to melt the whipped cream topping.
Serving: When ready to serve, garnish with fresh mango chunks and mint leaves for an inviting presentation that enhances the cake’s tropical essence!
Mango Cake Variations & Substitutions
Feel free to get creative with your Mango Cake—these ideas will help you tailor it to your taste!
-
Fruit Variations: Swap out mangoes for strawberries, peaches, or even plums. Each fruit will add its own unique burst of flavor, bringing a fresh take to this delightful dessert. Try to match seasonal fruit for the best taste!
-
Zesty Layering: Add a layer of lemon curd between the cake layers for a tangy twist. The bright acidity will beautifully contrast the sweetness of the mango filling, enlivening each bite for a refreshing treat.
-
Dairy-Free Delight: For a dairy-free version, replace heavy whipping cream with coconut cream and use almond milk instead of regular milk. You’ll create a uniquely tropical flavor that enhances the cake’s essence.
-
Nuts for Texture: Add finely chopped nuts like almonds or pistachios to the cake batter for a delightful crunch. Not only will this introduce a new texture, but it also adds a lovely nutty flavor that complements the fruity filling.
-
Spice It Up: For a touch of warmth, sprinkle in cinnamon or nutmeg to the cake batter. This will create a cozy undertone, particularly lovely during fall gatherings. The spices will dance harmoniously with the tropical notes of the mango!
-
Whipped Cream Infusion: Infuse your whipped cream with coconut or almond extract for an added layer of flavor. This simple switch can elevate the taste profile, making it even more divine while retaining that light, airy texture.
-
Heat Lover’s Twist: If you enjoy a spicy kick, consider adding a pinch of cayenne pepper to the mango filling! The heat will create a surprising yet delightful contrast to the smooth sweetness of the cake.
-
Presentation Perfect: Decorate your cake with fresh edible flowers or microgreens for an elegant touch. Not only will it make your cake look stunning at any gathering, but it will also bring an extra touch of freshness to the experience.
For more dessert inspiration, you might enjoy making a delicious Strawberry Crunch Cheesecake or a tropical Mango Sticky Rice. The possibilities are endless!
What to Serve with Asian Bakery-Style Mango Cake
As you prepare to enjoy this delightful mango cake, think about crafting a full meal that dances with flavor and freshness.
-
Coconut Sticky Rice: The rich, creamy texture of coconut sticky rice provides a perfect contrast to the lightness of the mango cake, enhancing its tropical vibe.
-
Fresh Fruit Salad: A medley of seasonal fruits not only complements the cake’s mango flavor but also adds a refreshing crunch that brightens the palate with every bite.
-
Green Tea: The earthy notes of freshly brewed green tea balance the sweetness of the cake, creating a harmonious pairing that will transport your taste buds to a serene Japanese tea house.
-
Mango Sorbet: For those who crave extra mango goodness, a scoop of mango sorbet delivers an icy and refreshing contrast that makes for an indulgent treat.
-
Coconut Milk Pudding: This creamy, subtly sweet pudding offers a luscious dessert option that echoes the mango’s tropical flavors while being light enough not to overpower.
-
Limeade: A zesty limeade will elevate the entire experience, cutting through the sweetness and adding a refreshing tang that dances in your mouth.
-
Minted Yogurt: Serve a dollop of lightly sweetened yogurt infused with fresh mint. This cooling element pairs wonderfully, bringing a delightful creaminess to the dessert experience.
Make Ahead Options
These Asian Bakery-Style Mango Cake preparations are perfect for busy home cooks looking to save time without sacrificing flavor! You can prepare the chiffon cake layers up to 24 hours in advance. Once baked and cooled completely, wrap the layers tightly in plastic wrap and refrigerate to maintain moisture. The whipped cream can also be made ahead of time and stored in the fridge for up to 3 days. When you’re ready to serve, simply layer the cake with mango chunks and whipped cream, then allow it to chill for about 1-2 hours before cutting. This way, you will enjoy a refreshing Mango Cake that is just as delicious as if it were freshly made!
Asian Bakery-Style Mango Cake Recipe FAQs
How do I select the perfect mangoes for this cake?
Absolutely! When choosing mangoes, look for ones that are slightly soft to the touch and have a sweet fragrance. Ripe mangoes should have smooth, unblemished skin without dark spots. If you’re unsure, opt for ones that have a slightly yellowish hue; they tend to be sweeter.
What is the best way to store the finished Mango Cake?
Store your mango cake in an airtight container in the refrigerator for up to 3 days to keep it fresh and moist. I recommend using a cake dome or wrapping it lightly with plastic wrap to avoid drying out. Ensure that it’s not exposed to strong odors in the fridge to maintain its delicious flavor!
Can I freeze the Mango Cake?
I generally advise against freezing this mango cake due to the whipped cream frosting, which may become watery upon thawing. If you want to store it for later, however, you can freeze individual slices for up to 1 month. To do this, wrap each slice tightly in plastic wrap, then place them in a freezer-safe container. When ready to enjoy, simply thaw in the refrigerator for a few hours.
What if my cake turns out dense instead of light and fluffy?
If your mango cake didn’t rise as expected, double-check that you whipped the egg whites to stiff peaks and folded them gently into the batter without over-mixing. These steps are crucial for maintaining the cake’s airy texture. If over-mixed, the cake can become dense, so be gentle when combining ingredients!
Is this mango cake suitable for my gluten-sensitive friend?
While this recipe traditionally includes cake flour, which contains gluten, you can make it gluten-free by substituting with a 1:1 gluten-free baking blend, ensuring your friend can enjoy a slice of this deliciousness, too! Always check the blend’s instructions as they may vary.
Can my pets enjoy this cake?
It’s best to keep this mango cake away from pets, as ingredients like sugar and whipped cream are not suitable for them. Stick to pet-friendly treats for your furry friends, and they’ll be just as happy!
Fluffy Mango Cake with Whipped Cream Bliss for Summer Delight
Ingredients
Equipment
Method
- Preheat your oven to 350°F (175°C) and line three 6-inch cake pans with parchment paper.
- Sift together the cake flour and baking powder in a large mixing bowl and set aside.
- Whip egg whites in a separate bowl until frothy, then gradually add 1/3 of the sugar and cream of tartar until stiff peaks form.
- In another bowl, whip egg yolks with remaining sugar, salt, milk, and vanilla until creamy and fluffy.
- Gently fold dry ingredients into egg yolk mixture, then carefully add meringue in three parts, folding gently.
- Divide batter among prepared pans and bake for 20-22 minutes or until a toothpick comes out clean.
- Allow cakes to cool in pans for 10 minutes then transfer to a wire rack to cool completely.
- Beat heavy whipping cream with powdered sugar until medium-stiff peaks form and chill until ready.
- Layer cooled chiffon cakes with whipped cream and fresh mango chunks.
- Apply a thin crumb coat of whipped cream and chill for 15-20 minutes before adding a final layer of whipped cream.
- Refrigerate assembled cake for 1-2 hours before serving for best results.
Leave a Reply