
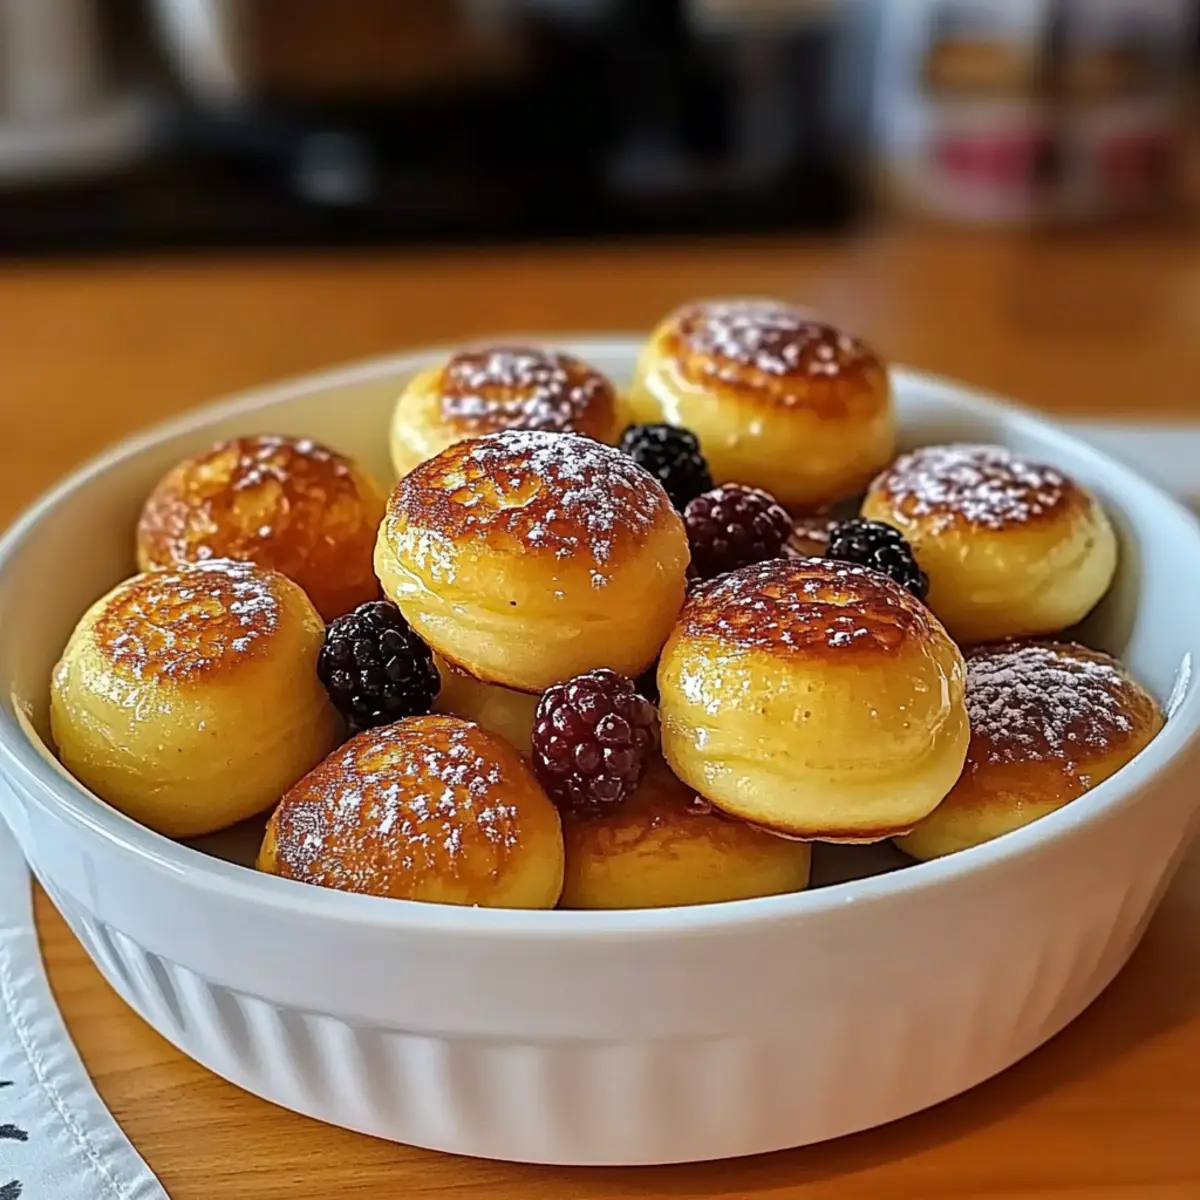
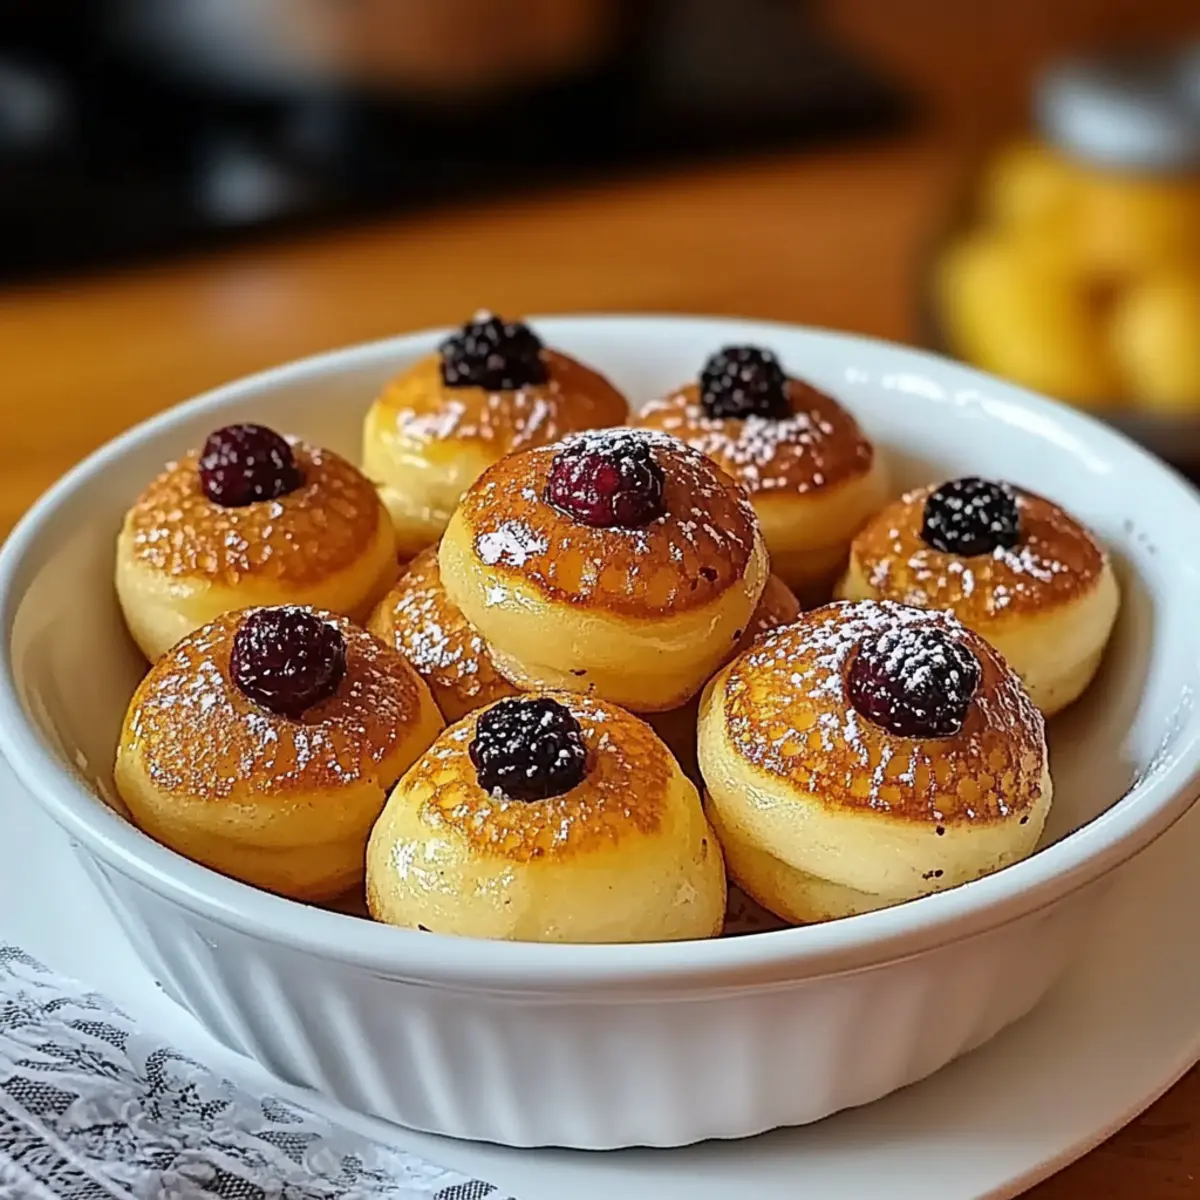
There’s nothing quite like the aroma of pancakes wafting through the house, especially when they come in delightful bite-sized portions! Meet my Light and Fluffy Pancake Poppers—your new go-to for a quick breakfast or a playful snack. These little gems are soft and airy on the inside while offering a slightly crispy exterior, making them perfect for both kids and adults alike. What’s more, you can customize each batch with your favorite mix-ins, whether it’s gooey chocolate chips, fresh berries, or even savory hints like cheese or herbs. Best of all, there’s no flipping involved—just pop them in the oven and let the magic happen! Are you ready to treat yourself to a fun and easy homemade creation that’s sure to bring smiles all around?
Why are Pancake Poppers a Must-Try?
Simplicity at Its Best: This recipe is incredibly straightforward, perfect for any home cook.
Customizable Delights: From chocolate chips to savory herbs, you can create endless variations.
Kid-Friendly Fun: These poppers are not only delicious but also exciting for kids to enjoy.
Quick and Efficient: No flipping required—just bake and serve, making breakfast a breeze!
Perfect for Any Occasion: Whether it’s a cozy weekend brunch or a quick snack, pancake poppers fit seamlessly into your routine.
Why not try them alongside some delightful Mini German Pancakes for a breakfast spread that everyone will love?
Pancake Poppers Ingredients
For the Batter
- All-Purpose Flour – This is the foundation for soft, fluffy poppers; swap it out for a gluten-free blend if needed.
- Sugar – Adds sweetness; consider using honey or maple syrup for a natural touch.
- Baking Powder & Baking Soda – Essential leavening agents that contribute to the fluffiness of your pancake poppers.
- Salt – A pinch enhances overall flavor.
- Buttermilk – Provides moisture and a light texture; mix milk with vinegar or lemon juice for a great substitute.
- Egg – Binds the mixture and adds richness; for a vegan option, use a flax egg.
- Butter – Adds richness and moisture; melted butter works best, or try coconut oil for a dairy-free alternative.
For the Mix-ins (Optional)
- Chocolate Chips – Add a gooey surprise; perfect for a sweet variation of pancake poppers.
- Berries – Fresh or frozen berries are fantastic for a burst of flavor and nutrition.
- Nut Butter – A delightful option for a creamy treat in every bite.
- Savory Fillings – Cheese, herbs, or cooked bacon can transform your pancake poppers into a delicious brunch item.
These pancake poppers are sure to become a family favorite, and with so many options, anyone can enjoy their deliciousness!
Step‑by‑Step Instructions for Pancake Poppers
Step 1: Preheat and Prepare
Begin by preheating your oven to 375°F (190°C) while you prepare your mini muffin tin. Generously grease each cup with cooking spray or melted butter to ensure easy release later. Set the greased tin aside, ready to hold the delicious pancake poppers that are about to come to life!
Step 2: Combine Dry Ingredients
In a large mixing bowl, whisk together the dry ingredients: all-purpose flour, sugar, baking powder, baking soda, and a pinch of salt. Ensure there are no lumps in the flour, as this will help achieve a light and fluffy texture for your pancake poppers. Once mixed, this dry blend will lay the foundation for your batter.
Step 3: Mix Wet Ingredients
In a separate bowl, combine the wet ingredients: buttermilk, egg, vanilla extract, and melted butter. Whisk the mixture until it becomes smooth, allowing the melted butter to incorporate fully. This wet mixture is crucial as it will help bind the dough and create that moist center in your pancake poppers.
Step 4: Blend the Mixtures
Gently fold the wet ingredients into the dry ingredients using a spatula. Be careful not to overmix; a few lumps are perfectly fine! This step is essential to keep your pancake poppers airy and soft. Allow the combined batter to sit for a couple of minutes as this helps improve the texture.
Step 5: Fill the Muffin Tins
Using a spoon or a small cookie scoop, fill each mini muffin cup about ¾ full with the prepared batter. If you’re adding mix-ins such as chocolate chips or berries, sprinkle them on top of the batter in each cup—this will give your pancake poppers delicious surprises in every bite!
Step 6: Bake to Perfection
Place the filled mini muffin tin in the preheated oven and bake for 12-15 minutes, or until the tops are golden brown and a toothpick inserted comes out clean. Peek through the oven window to see that delightful rise; these pancake poppers should look puffy and inviting!
Step 7: Cool and Serve
Once baked, remove the muffin tin from the oven and let it cool for about 5 minutes. Then, carefully remove the pancake poppers from the tin, allowing them to cool on a wire rack. Serve them warm with your favorite dips like maple syrup or fresh fruit preserves for an extra tasty treat!

Expert Tips for Pancake Poppers
- Mix Gently: Avoid overmixing the batter to keep your pancake poppers light and fluffy. A few lumps are perfectly fine!
- Greasing is Key: Make sure to grease the muffin tins well to prevent the poppers from sticking. A good non-stick spray works wonders!
- Rest the Batter: Allowing the batter to rest for about 5 minutes before baking enhances fluffiness and helps create that perfect texture.
- Watch Your Bake Time: If you opt for larger muffin tins, adjust the baking time to 18-20 minutes for thoroughly cooked poppers.
- Experiment Freely: Don’t hesitate to customize. Mix chocolate chips, berries, or even savory ingredients to create your ideal pancake poppers!
Pancake Poppers: Endless Customizations
Feel free to unleash your creativity and transform these pancake poppers into your family favorites!
-
Gluten-Free: Substitute all-purpose flour with a 1:1 gluten-free blend for a deliciously inclusive option.
-
Veggie Boost: Add finely chopped spinach or grated zucchini to the batter for a nutritious twist. Kids will never know they’re enjoying some greens!
-
Fruit Infusion: Toss in fresh diced apples or sliced bananas for a naturally sweet and fruity treat. This variation will bring a lovely flavor burst in every bite.
-
Nutty Texture: Stir in some chopped nuts like walnuts or pecans for added crunch and nutrition. The toasty flavors will elevate your dessert experience.
-
Savory Goodness: Incorporate cooked bacon bits or shredded cheese to whip up a delightful brunch-worthy option. Serve alongside scrambled eggs for a lovely meal!
-
Spiced Surprise: Add a dash of cinnamon or pumpkin spice for a warm autumnal vibe. Your home will be filled with inviting, aromatic scents reminiscent of cozy gatherings.
-
Indulgent Chocolate: Fold in mini chocolate chips or drizzle melted chocolate on top. This sweet bonus takes them to a whole new level of deliciousness!
-
Dairy-Free Delight: Use almond milk and coconut oil instead of buttermilk and butter to create a scrumptious dairy-free version. These can be just as fluffy and flavorful!
By trying out these variations, you can transform the humble pancake poppers into a delightful treat that suits everyone’s palate. And for a wonderful breakfast spread, why not add some Mini German Pancakes alongside your delightful poppers?
Storage Tips for Pancake Poppers
- Room Temperature: Allow cooked pancake poppers to cool completely before storing. They can sit out for up to 2 hours, then should be transferred to the fridge or freezer.
- Fridge: Store pancake poppers in an airtight container for up to 4 days. Keeping them sealed helps maintain their fluffy texture.
- Freezer: For extended storage, freeze pancake poppers in a single layer on a baking sheet, then transfer to an airtight container or freezer bag. They’ll last for up to 3 months.
- Reheating: When ready to enjoy, reheat from frozen in the microwave for about 30 seconds, or in a toaster oven until warmed through and slightly crispy again. They’re delicious!
Make Ahead Options
These Pancake Poppers are a fantastic choice for meal prep, making your mornings smoother and stress-free! You can prepare the batter up to 24 hours in advance; simply mix your dry ingredients and wet ingredients separately, refrigerate them, and combine right before baking. If you’re short on time, you can also bake the poppers, let them cool, and refrigerate in an airtight container for up to 3 days. When you’re ready to enjoy, just reheat them in the microwave for about 15-20 seconds or in the toaster oven until warm. This approach helps maintain their delightful fluffiness, keeping them just as delicious as when freshly baked!
What to Serve with Light and Fluffy Pancake Poppers?
Imagine a delightful breakfast spread that invites everyone to the table with warm, inviting aromas and colorful plates.
- Maple Syrup: The classic sweet drizzle that complements the poppers beautifully, enhancing their fluffy texture with each bite.
- Fresh Berries: A vibrant mix of strawberries, blueberries, and raspberries adds a refreshing tartness, balancing the sweetness perfectly.
- Yogurt Parfait: Creamy yogurt layered with granola and fruit provides a satisfying crunch, making for a well-rounded breakfast option.
- Savory Eggs: Scrambled or poached eggs introduce a rich and savory element, creating a hearty meal that satisfies hunger.
- Bacon Strips: The crispy, salty goodness of bacon adds a delightful contrast to the sweet poppers, giving a well-rounded flavor experience.
- Fruit Preserves: A side of homemade or store-bought fruit preserves can provide an extra burst of flavor, making each popper feel like a delightful surprise.
- Hot Chocolate or Coffee: Pair these treats with a warm beverage to create a cozy atmosphere, perfect for leisurely weekend mornings.
- Whipped Cream: A dollop of light whipped cream on the side elevates the experience, inviting indulgence into your breakfast.
- Chia Seed Pudding: For a unique twist, serve alongside chia seed pudding, offering a healthy, crunchy alternative that’s full of flavor.
Pancake Poppers Recipe FAQs
How do I choose ripe ingredients for my Pancake Poppers?
Absolutely! For ingredients like berries, choose ones that are plump, firm, and free from any dark spots. For chocolate chips, go for high-quality brands that melt well. When selecting eggs, opt for fresh ones—check the date on the carton, and look for a smooth, uncracked shell. A fresh egg will also have a thicker white and a bright yolk.
What are the best storage methods for Pancake Poppers?
Very! Once they cool, store any leftover pancake poppers in an airtight container in the refrigerator. They will remain fresh for up to 4 days. If you’d like them to last longer, freezing is a great option. Simply place them in a single layer on a baking sheet, freeze until solid, and then transfer to an airtight container or freezer bag. They can stay at peak freshness in the freezer for up to 3 months!
Can I freeze Pancake Poppers for later use?
Of course! To freeze your pancake poppers, let them cool completely first. Then, arrange them in a single layer on a baking sheet and put them in the freezer for about 1-2 hours. Once they are frozen solid, you can transfer them into a freezer-safe bag or container. They can easily be reheated in the microwave for approximately 30 seconds or in a toaster oven until heated through and crispy, making a quick breakfast or snack anytime!
What if my pancake poppers turn out dense instead of fluffy?
Don’t worry! If your pancake poppers come out dense, the likely culprit is overmixing the batter; it’s essential to fold the wet and dry ingredients just until combined. Also, ensure that your baking powder and baking soda are fresh—they should bubble up when combined with wet ingredients. If in doubt, double-check that you’re measuring correctly. Finally, remember to let the batter rest for about 5 minutes before baking; this step can greatly affect the texture!
Are there any allergy considerations for Pancake Poppers?
Absolutely! For a gluten-free version, you can use a 1:1 gluten-free baking blend instead of all-purpose flour. If you’re cooking for someone with a dairy allergy, substitute buttermilk with a non-dairy milk combined with a little vinegar or lemon juice. For an egg-free alternative, a flax egg (1 tablespoon ground flaxseed mixed with 2.5 tablespoons water, let sit until gel-like) can replace a regular egg. Just make sure to communicate any ingredient changes when sharing with others!

Delicious Pancake Poppers: Fluffy Bites for Any Occasion
Ingredients
Equipment
Method
- Preheat your oven to 375°F (190°C) and grease each cup of your mini muffin tin.
- In a large bowl, whisk together flour, sugar, baking powder, baking soda, and salt.
- In a separate bowl, combine buttermilk, egg, and melted butter; whisk until smooth.
- Gently fold the wet ingredients into the dry ingredients without overmixing.
- Fill each mini muffin cup about ¾ full with batter, adding mix-ins if desired.
- Bake for 12-15 minutes or until golden brown and a toothpick comes out clean.
- Let cool for 5 minutes, then remove from the tin and serve warm.
Leave a Reply